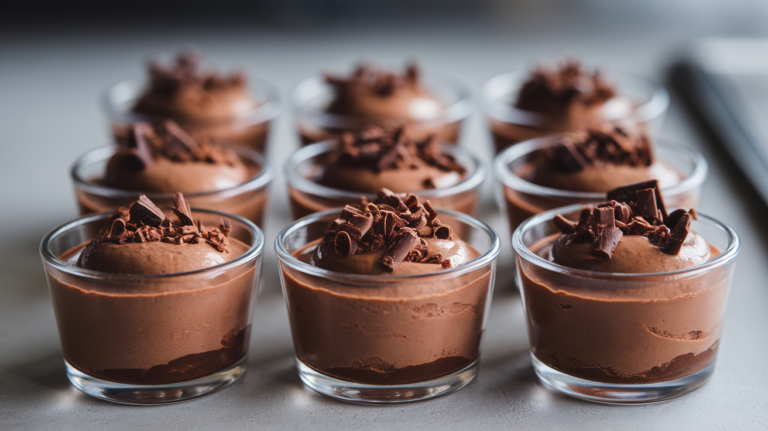
Peanut Butter Layered Pudding Cups
You want dessert. But you don’t want to bake. You don’t want to measure flour. You don’t even want to turn on the oven light.
Perfect.
These Peanut Butter Layered Pudding Cups are creamy, chocolatey, peanut buttery little layers of happiness that come together with almost suspicious ease. They look fancy. They taste indulgent. And they require minimal life effort.
Layer, chill, devour. That’s the plan.
Why This Recipe is Awesome
First: zero baking. Not even a little bit.
Second: layers. And we all know layers make everything feel gourmet. It’s just pudding—but stacked. Suddenly it’s impressive.
Third: texture heaven. Smooth chocolate pudding, fluffy peanut butter cream, maybe a little cookie crunch in between? It’s basically dessert architecture.
Also:
- Comes together fast.
- Great for parties or make-ahead treats.
- Customizable without chaos.
- Beginner-proof and stress-free.
Honestly, it’s the kind of dessert that makes people say, “Wait… you made this?” Yes. Yes, you did.
Ingredients You’ll Need
Simple ingredients. Big dessert energy.
For the chocolate pudding layer:
- 1 box (3.9 oz) instant chocolate pudding mix – The shortcut hero.
- 2 cups cold milk – For pudding magic.
For the peanut butter layer:
- 1 cup creamy peanut butter – Smooth and rich.
- 4 oz cream cheese, softened – Adds structure and tang.
- 1/2 cup powdered sugar – Sweetens and thickens.
- 1 teaspoon vanilla extract – Small but mighty.
- 1 cup whipped topping (or freshly whipped cream) – Makes it light and fluffy.
Optional layers & toppings (because we love drama):
- Crushed chocolate cookies or graham crackers
- Mini chocolate chips
- Chopped peanuts
- Chocolate syrup
- Extra whipped cream
Build your masterpiece.
Step-by-Step Instructions
1. Make the Chocolate Pudding
In a bowl, whisk together the instant pudding mix and cold milk.
Whisk for about 2 minutes until it thickens.
Place in the fridge to set while you prepare the peanut butter layer.
2. Prepare the Peanut Butter Mixture
In a separate bowl, beat the softened cream cheese until smooth.
Add peanut butter, powdered sugar, and vanilla. Mix until creamy and fully combined.
Make sure there are no lumps. Lumps ruin the silky vibe.
3. Fold in the Whipped Topping
Gently fold in the whipped topping.
Use a spatula and light motions—don’t stir aggressively. You want it airy and fluffy, not dense.
The mixture should look smooth and mousse-like.
4. Start Layering
Grab your serving cups (clear ones if you want to show off the layers).
Add a spoonful of chocolate pudding to the bottom.
Top with a layer of peanut butter mixture.
If using crushed cookies, sprinkle a thin layer between the pudding and peanut butter for crunch.
Repeat layers until the cups are filled, finishing with peanut butter or chocolate on top.
5. Chill
Refrigerate for at least 1–2 hours.
This helps everything firm up and lets the flavors settle together.
6. Decorate
Top with whipped cream, chocolate drizzle, mini chips, or chopped peanuts.
Go as simple or dramatic as you like. This is your dessert stage.
Common Mistakes to Avoid
Let’s keep this smooth and impressive.
1. Using warm milk for pudding.
It won’t set properly. Cold milk only.
2. Skipping the chill time.
If you serve immediately, the layers won’t hold their shape. Patience pays off.
3. Not softening the cream cheese.
Cold cream cheese = lumps. Let it sit at room temperature first.
4. Overmixing after adding whipped topping.
You’ll deflate the fluffiness. Fold gently.
5. Making layers too thick.
Balance is key. Thin, even layers look better and taste better.
Alternatives & Substitutions
Want to remix the layers? Let’s talk.
- Vanilla pudding instead of chocolate – Sweeter, lighter vibe.
- Dark chocolate pudding – Richer and slightly less sweet.
- Crunchy peanut butter – Adds texture to the creamy layer.
- Homemade whipped cream instead of store-bought topping – Tastes fresher.
- Brownie crumbles instead of cookies – Next-level indulgence.
You can even add a thin caramel layer or drizzle melted chocolate between layers. IMO, a tiny sprinkle of flaky salt on top makes the flavors pop.
FAQ (Frequently Asked Questions)
1. Can I make these ahead of time?
Yes! They’re perfect for prepping a day in advance. Just keep them covered in the fridge.
2. How long do they last?
About 3–4 days in the fridge. The cookie layers may soften slightly over time—but still delicious.
3. Can I freeze them?
You can, but the texture may change slightly when thawed. Best enjoyed chilled, not frozen solid.
4. Can I use natural peanut butter?
Yes, but stir it very well before mixing. Oil separation can affect consistency.
5. Can I make this in one large dish instead of cups?
Absolutely. Use a trifle dish or 8×8 pan and layer the same way. Slice and serve.
6. Is this overly sweet?
It’s indulgent, but balanced by the cream cheese and peanut butter. If you prefer less sweetness, reduce powdered sugar slightly.
Final Thoughts
Peanut Butter Layered Pudding Cups are proof that dessert doesn’t have to be complicated to be impressive.
They’re creamy, rich, layered, and completely customizable. Perfect for parties, holidays, or random cravings that demand something extra.
So grab some cups, start layering, and create your own little dessert masterpiece.
Then sit back, take a spoonful, and enjoy the fact that you just made something that looks fancy but required almost zero effort. Now that’s a win.