No-Bake Peanut Butter Cheesecake Cups
You want cheesecake. But you don’t want to bake. Or wait. Or deal with water baths and “cracks are normal” speeches.
I get it. Same energy.
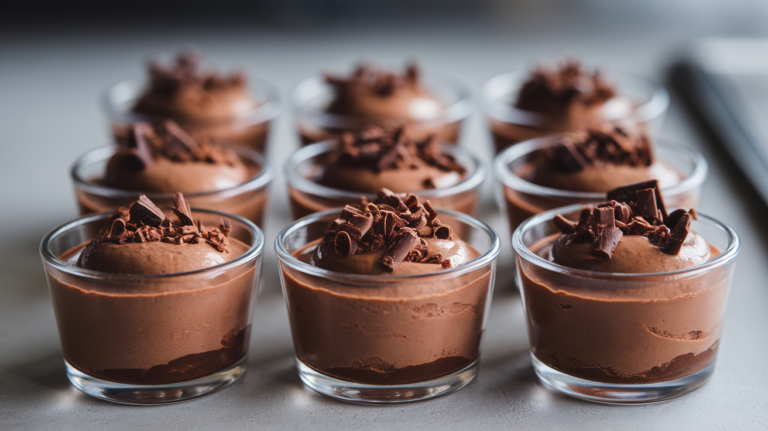
These No-Bake Peanut Butter Cheesecake Cups are creamy, rich, and dangerously easy. They look like you tried really hard… but you absolutely did not. No oven. No stress. Just layers of peanut butter cheesecake goodness chilling in cute little cups, waiting to impress people (or just you at 11:47 p.m.—no judgment).
Let’s make something that tastes fancy but requires minimal life effort.
Why This Recipe is Awesome
First of all: no baking. Which means no oven preheating, no overbaking panic, and no dramatic cheesecake cracks.
Second: portion control. Individual cups mean built-in serving sizes. Whether you respect that is up to you.
Third: texture. These are smooth, creamy, slightly fluffy, and perfectly peanut buttery. Not heavy like traditional cheesecake. Not mousse. Just right.
Also:
- Comes together in under 20 minutes.
- Perfect for parties (or meal-prepping dessert, because balance).
- Make-ahead friendly.
- Beginner-approved. Zero culinary stress required.
If you like peanut butter and cheesecake, this is basically your destiny.
Ingredients You’ll Need
Nothing complicated. Just solid, dependable ingredients doing their thing.
For the crust layer:
- 1 cup graham cracker crumbs – Crunchy base = non-negotiable.
- 3 tablespoons melted butter – Holds everything together.
- 1 tablespoon sugar – Optional, but recommended for extra sweetness.
For the cheesecake filling:
- 8 oz cream cheese, softened – Full-fat works best. Trust me.
- 1 cup creamy peanut butter – Smooth and classic.
- 1/2 cup powdered sugar – Sweetens and thickens.
- 1 teaspoon vanilla extract – Subtle but important.
- 1 cup heavy whipping cream – Whipped for that fluffy texture.
Optional toppings (aka the fun part):
- Melted chocolate
- Chopped peanuts
- Mini peanut butter cups
- Chocolate chips
- Whipped cream
You control the vibe.
Step-by-Step Instructions
1. Make the Crust
In a bowl, combine graham cracker crumbs, melted butter, and sugar. Stir until the mixture resembles damp sand.
Spoon about 1–2 tablespoons into the bottom of each serving cup. Press it down firmly with the back of a spoon.
Place in the fridge while you make the filling.
2. Whip the Cream
In a separate bowl, whip the heavy cream until stiff peaks form.
Don’t overwhip unless you’re trying to make butter. Stop when it holds its shape. Set aside.
3. Mix the Cheesecake Base
In another bowl, beat the softened cream cheese until smooth.
Add peanut butter, powdered sugar, and vanilla. Mix until creamy and lump-free.
Make sure your cream cheese is truly softened. Lumps are not cute here.
4. Fold in the Whipped Cream
Gently fold the whipped cream into the peanut butter mixture.
Use a spatula and light motions. Don’t stir aggressively—you want to keep that airy texture.
The mixture should be thick, fluffy, and spoon-lick worthy.
5. Assemble the Cups
Spoon or pipe the cheesecake filling over the chilled crust layer. Smooth the tops.
If you want bakery-style presentation, use a piping bag. If not, a spoon works perfectly fine.
6. Chill
Refrigerate for at least 2–3 hours until set. Overnight is even better if you have patience (which… do you?).
7. Decorate and Serve
Drizzle with melted chocolate, sprinkle chopped peanuts, or add whipped cream on top.
Or go wild and do all three.
Then serve chilled and act like this took serious skill.
Common Mistakes to Avoid
Let’s keep this smooth and drama-free.
1. Using cold cream cheese.
It won’t blend properly and you’ll get lumps. Let it soften at room temperature first.
2. Overmixing after adding whipped cream.
You’ll deflate the mixture and lose that light texture. Fold gently.
3. Skipping chill time.
If you try to eat it immediately, it’ll be soft and messy. Chill. It’s worth it.
4. Not pressing the crust firmly.
A loose crust crumbles everywhere. Press it down like you mean it.
5. Overwhipping the cream.
Stiff peaks, not scrambled cream chaos. Watch it carefully.
Alternatives & Substitutions
Want to change things up? Let’s explore.
- Chocolate cookie crust instead of graham crackers – Richer and more indulgent.
- Oreo crust – Remove the filling, crush the cookies, mix with butter. Instant upgrade.
- Almond butter instead of peanut butter – Slightly different flavor, still delicious.
- Cool Whip instead of whipped cream – Shortcut option if you’re feeling lazy (no shame).
- Maple syrup instead of powdered sugar – Use less and adjust consistency carefully.
You can also layer in:
- Chocolate ganache between crust and filling
- Caramel drizzle
- Crushed pretzels for sweet-salty crunch
IMO, adding a light sprinkle of flaky salt on top takes it from good to elite.
FAQ (Frequently Asked Questions)
1. Can I make this ahead of time?
Yes! In fact, you should. They taste even better after chilling overnight.
2. Can I freeze these?
Absolutely. Freeze for up to a month. Thaw slightly before eating—or enjoy semi-frozen for a firmer texture.
3. Can I make this in one large dish instead of cups?
Yes. Use an 8×8 pan and slice into squares once set. Easy conversion.
4. Why is my filling too soft?
Either it hasn’t chilled long enough or the whipped cream wasn’t stiff enough. Chill longer first before adjusting anything.
5. Can I use natural peanut butter?
Yes, but stir it really well first. Separated oil can affect the texture.
6. Do I have to use heavy cream?
For best results, yes. It creates that fluffy cheesecake texture. Lighter creams won’t whip properly.
7. How long do they last in the fridge?
About 4–5 days in an airtight container. But realistically? They’ll disappear much sooner.
Final Thoughts
These No-Bake Peanut Butter Cheesecake Cups are the kind of dessert that makes you feel like you’ve hacked the system. Minimal effort. Maximum reward.
They’re creamy, peanut buttery, perfectly sweet, and endlessly customizable. Plus, they look adorable in individual cups, which automatically makes them 40% more impressive. That’s just science.
So go ahead—make a batch, chill them properly, and top them with something dramatic.
Then grab a spoon and enjoy every silky bite. You deserve this level of dessert excellence.